This is no longer a viable FP or extra credit option since it can be done in less than 1 hour but I left it up to provide guidance.
Note you will need to document your installation and experiences in the DB in either case but you will not need to use Jing for demonstration.
If you choose this option you must make your USB Linux instance persistent and this requires some research on your behalf. Creating a Linux USB instance is easier and easier so the creation of a persistent USB Linux instance renders the project suitable in rigor for the CISS 100 FP. Note there are many different instructions for this and you are free to use the resource of your choice (I have provided some resources below)
Note the USB option is installed on the USB drive not on your computer – do not choose install on hard drive!. I’ll repeat this important information to drive it home as failing to follow this instruction may result in wiping/over-writing your hard drive, Note the USB option is installed on the USB drive not on your computer – do not choose install on harddrive!. As with the VB Ubuntu installation, please read this page in its entirety before beginning.
Also note that Mac does not afford access to its boot sequence thus Mac users that do not have access to a PC may use a slightly different version referenced below (i.e. you have to perform some terminal configuration). Note that I highly recommend that everyone create a bootable Linux USB for their travels so even if you don’t choose this for your FP I recommend you do this for your professional development at a later date.
Please turn in your USB drive to my office in Brahan (BRN) 206 prior to the close of grades and PLEASE LABEL YOUR USB DRIVE – 🙂.The USB will be available for pickup 2 days after the close of grades. If mailing the USB drive, please send to the following address and you may include a self addressed stamped envelope for its return.
Prof James Looby
HVCC 80 Vandenburgh Ave,
Troy, NY 12180
PC Boot Sequence Background
First, I recommend you read Wikipedia’s Boot Sequence entry if you have not already done so however, in a nutshell, a PC has a boot order (i.e. the BIOS boot sequence specifies where and in what order the system looks for an OS). If left to itself, by default, the PC will typically look in and load from the DVD first (as this facilitates installing an OS on a new system). If it doesn’t find an OS in the DVD drive it moves onto the Hard Drive (this of course is the natural situation once an OS has been loaded). You may change the order of where the system looks for an OS in the BIOS. The BIOS can be accessed during the boot sequence (i.e. when you turn your computer on) prior to loading the OS by repeatedly pressing the F12 key (or on some systems the F2 or F8). The system will tell you how to access this during power on (quite often real quickly). So here is what you should do:
Turn on your system and start pressing the F12 key over and over. While you are doing this watch the screen as it may tell you something different (i.e. something like “Press F2 to enter Setup). If it tells you something different, turn off your computer and do as the computer instructed.
Once in the Bios look for “power on” or “boot sequence” and following the instructions on the screen (i.e. use up and down arrows or space bar or enter bar or….) change the order that your system looks for bootable media so that it looks at the USB drive first. Note this is doing nothing to your system as if there is no bootable media in the USB drive (the usual case) it defaults to loading the OS from the Hard Drive.
Please let me know how this goes as I just wrote this off the top of my head so it hasn’t been through iterations of user-centered design. Also I wrote this from memory from older BIOS systems rather than today’s UEFI systems.
Here is one implementation resource
These first 2 links are from the Ubuntu site.
Windows – http://www.ubuntu.com/download/help/try-ubuntu-before-you-install
Mac – http://www.ubuntu.com/download/help/create-a-usb-stick-on-mac-osx
Here is another implementation
Here is a real interesting and extremely valuable final project from PC World and author Alex Castle located here: http://www.pcworld.com/article/2021326/turn-your-flash-drive-into-a-portable-pc-survival-kit.html#tk.nl_pcwbest
You must complete all steps including the System Rescue CD and this USB drive must be demonstrated (or sent) to the Instructor. The Instructor will of course return the USB drive after grading the final project.
Turn your flash drive into a portable PC survival kit

- Jan 14, 2013 3:00 AM
If you’re using your flash drive as a vehicle for simple file transfers, you’re missing out on one of the single-best roles one of these wee data buckets can fulfill. Indeed, hardcore enthusiasts know that simple flash drives are perfect portable repositories for all the software that can breathe life into an otherwise ailing PC.All the web apps in the world won’t help you when your PC breaks down or falls prey to a particularly nasty piece of malware and refuses connect to the Internet. A properly loaded USB drive, on the other hand, can be a machine saver. And when your grandma calls with a dire PC emergency, you’ll be glad to have an always-ready “ninja drive” to slip into your pocket as you run out the door.In this article we’ll show you how to load out a USB drive with everything you need in case of a PC emergency. So next time your computer breaks down, don’t panic. Instead, take a deep breath, plug in your ninja drive, and start making things right.
PortableApps
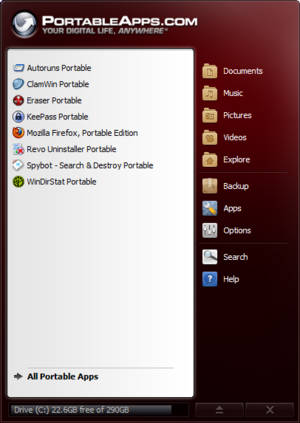
The first thing you’ll want to install on your drive is PortableApps—a free, open source platform for installing desktop applications on removable media, like a USB drive. PortableApps manages the installation of new portable software on your USB drive, and also acts as a frontend when you’re actually using the USB drive, letting you easily browse and launch applications.
PortableApps maintains a list of hundreds “portable” versions of popular free programs, designed to work without installation. You can find the full list here.
Each of the following apps with the word “Portable” in their title is available for the PortableApps platform. You can download them at the links provided, or just start PortableApps and click on Apps > Get More Apps. You’ll see a large list of applications appear. Just check the ones you want and click Next to download and install them all automatically.
Chrome Portable
Even though it’s not a maintenance application, strictly speaking, a mobile browser is a great inclusion on your emergency thumb drive. Why? A lot of malware targets your web browser, so it’s one of the most likely components of your system to be out of commission, or otherwise compromised. Chrome’s sandboxing security feature and Safe Browsing functionality—which guards against malicious websites and downloads—make it one of the better options for mucking around on a potentially infected system.
Spybot Search and Destroy Portable
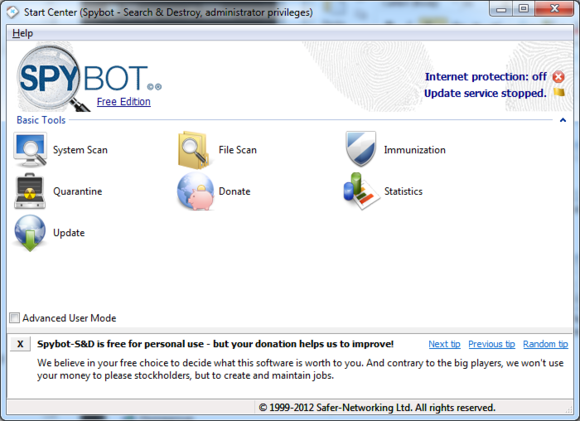
If your computer is running slow because of malware, Spybot S&D should be the first (and often last) weapon in your arsenal. It’s one of the oldest and best spyware removal suites around, and should be able to weed out most malware on even the slowest of machines.
ClamWin Portable
ClamWin is a Windows graphical interface for the Clam open source antivirus engine. It doesn’t provide real-time scanning like you’d get in an installed antivirus application, but the portable versions provides powerful on-demand virus scanning for any suspicious files.
Malwarebytes
Many unofficial tech support geeks consider Malwarebytes to be a go-to malware scanning solution, but it doesn’t offer a portable version. You can, however, save the Malwarebytes installation file to your emergency drive and unpack the app directly onto the maligned PC after you’ve taken a first pass at badware using ClamWin and Spybot portable. A second opinion never hurts when you’re dealing with viruses.
Kaspersky TDSSKiller

If you’ve tried running malware removal programs like Spybot Search and Destroy but your computer is still exhibiting malware symptoms like bogus error messages and browser hijacking, you might be dealing with a rootkit. Rootkits are designed to conceal malware running on your system, and can be very hard to detect themselves. If you suspect your computer might be infected with one, try running TDSSKiller, a rootkit scanner from Kaspersky. Just leave the .exe file on your thumb drive, and run it on the infected computer—it will find and remove most rootkit malware.
FileAssassin
Even if you’re not trying to uninstall whole programs, deleting files can prove to be a challenge—especially when you’re dealing with an infected system. Windows might tell you that access is denied to a file, or that another program or user is currently using it, or otherwise tell you that the file you want gone isn’t going anywhere at all.
FileAssassin lets you get around those roadblocks, and delete any file you want. Make sure you really want it gone, though, because it’s going to be.
When you snag the program, make sure to grab the portable version, at the bottom of the download list.
Eraser Portable
Sometimes the problem isn’t that you can’t delete a file, it’s that you want to make sure that it’s really, really gone. If you need to securely delete sensitive documents or files, use Eraser—an application for securely erasing and overwriting files and directories stored on standard mechanical hard drives. You can also user Eraser to overwrite all the empty space on a disk, making sure anything you’ve deleted in the past is truly gone.
Revo Uninstaller Portable
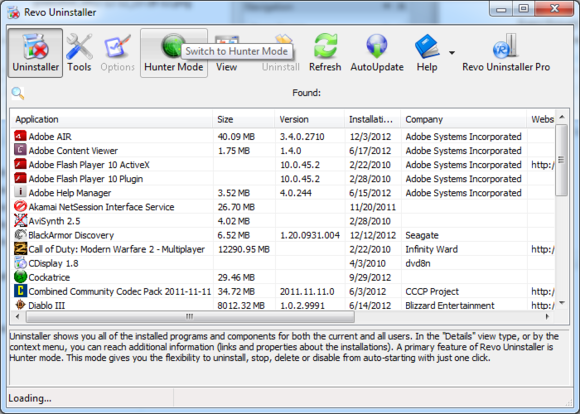
One of the simplest ways to get a gridlocked computer running faster is to remove programs that you don’t need. This has two benefits: you clear up hard disk space, which can speed up your computer, and you reduce the number of apps running at startup, which can make your boot time shorter. You can uninstall programs by hand, but that’s slow going and the programs aren’t always completely removed. Instead, keep a portable copy of Revo Uninstaller handy to quickly and completely uninstall as many programs as you want.
Autoruns Portable
One of the main reasons that older systems gradually slow down is the accumulation of programs and services set to automatically run at startup. Autoruns is a powerful app from Sysinternals that shows you every single process that will start with your computer, along with other common sources of trouble, including browser toolbars and shell extensions. Telling a process to not run at startup is as simple as unchecking a box.
KeePass Portable
If you use KeePass to store your passwords (and if you don’t, you should think about it), it’s not a bad idea to keep your KeePass install and password database on a thumb drive. That way, you’ll always be able to access your online accounts, no matter what computer you’re on. Even better, you don’t have to worry about identity theft if you lose the USB drive, because the Keepass database is encrypted and requires a master password. Be careful about logging in to potentially infected computers with KeePass, though.
The other USB drive: SystemRescueCD
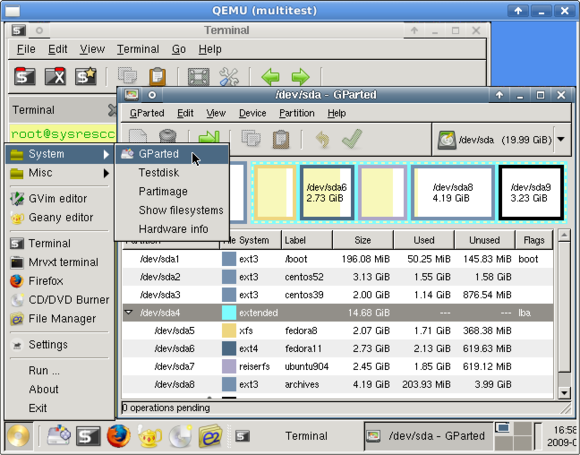
If you want to be really, truly prepared for a PC disaster, you can go one step further than just creating an emergency app thumb drive. By loading up a second drive with a Live install of the SystemRescueCD operating system, you’ll be prepared even if your computer’s OS is so FUBARed that you can’t even log in.
SystemRescueCD is a free live operating system, meaning you don’t have to install it on a hard drive. Just insert the SystemRescueCD USB drive into the computer, restart, and boot from the thumb drive. The Linux-based operating comes equipped with software that you can use to access the data on your hard drives and back it up across the network, along with various other handy-dandy utilities—basically, everything you need to fix (or at least recover) as much of your broken OS as possible. The makers of the distribution were even kind enough to provide step-by-step instructions on how to get a SystemRescueCD live drive up and running.