Required Reading
The Linux Command Line by Shotts – 1.9
Again, you are responsible for all previous Linux coursework (labs & readings) and for researching the commands below in more depth using Wikipedia and the built-in Linux man pages. This will become increasingly important through the remainder of this course and to this extent you will note the lab instructions will get shorter requiring you to research and review past material.
As before, you will be taking screenshots and pasting them into your .pdf submission file with the appropriate headings and submitting them.
Students often struggle with file/directory permissions especially when manipulating them with binary numbers. To this extent here is a very nice supplemental presentation should you need it: http://linuxcommand.org/lc3_lts0090.php
Intro ScreenShot
Open or launch your SSH application (e.g. Mac Terminal or Win PuTTy). Please resize your Terminal to make it larger to capture as much as possible but note you may not capture everything and this will be fine. If possible just take a screenshot/picture of your open terminal as if you include other items the text in the Terminal can be very small making it harder for me to see your commands. Paste this screenshot into your correctly named pdf document and label or title this screenshot “Intro Screenshot”.
5.0 Files & Directories Introduction
If you have me in class… as relentlessly driven home… 🙂 … sorry … 🙂 … everything in Linux is treated as a either a process or a file and this generic file includes: files, directories, your terminal and display and even your network connections. This simplifies the model/architecture facilitating many things but in this tutorial/lab we will constrain our focus to just files and directories.
Also please recall our discussion about file associations as Linux only has 2 types of files (as the file extension is irrelevant unless the OS is modified to recognize extension associations). In contrast, Windows and Mac allow and recognize file extension associations allowing a user to “click” on an MP3 file (.mp3 extension) allowing your media application to open and play the file.
To begin, let’s look at a long listing of my AcadNX home directory in detail.
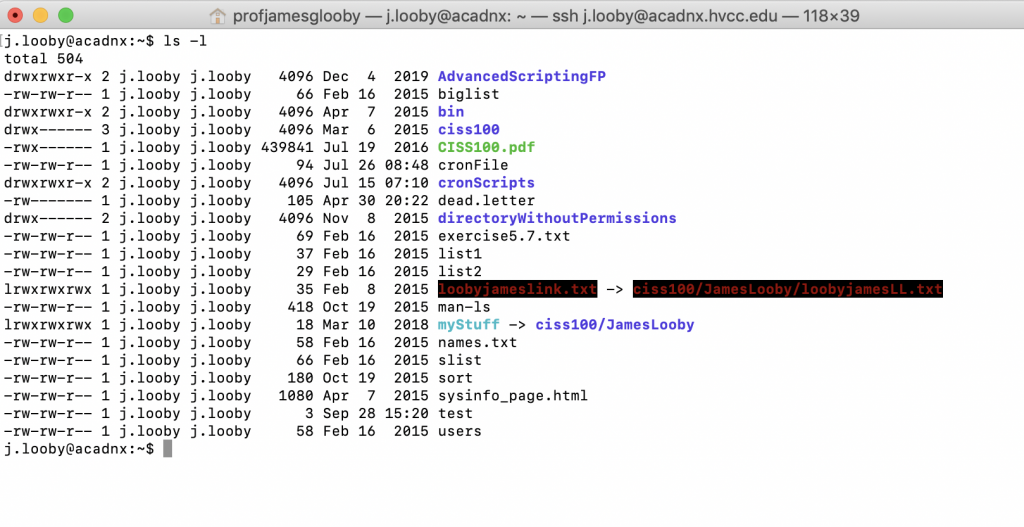
We see considerable information so let’s begin dissecting and understanding it field by field.
Field 1 – File Type: Each line will begin with a letter that denotes the file type, – for a normal file, d for a directory, s for a socket file (there are no sockets) and l for a link file. As a result I can see that exercise5.7.txt is a file and ciss100 is a directory and loobyjameslink.txt is a link albeit a broken link identified by its color (typically blacked out or red).
Field 2 – Access Permissions: The next field conveys the file/directory permissions in 9 characters or 3 groups of 3 characters. These 3 groups are in order, first the user or owner, second the group (i.e. user’s group) and lastly the world or also referred to as ‘others’. The 3 characters for each group convey the read, write and execute permission (i.e. they are either present or not present). To provide some examples:
-rwxrwxrwx represents a file that everyone (user, group & world) can read, write and execute (and delete).
-rw——- represents a file that only the owner can read and write – no-one else can read or write and no-one has execution rights (e.g. your mailbox file).
Now the rwx permissions are little different for files and directories.
read permission refers to a user’s authorization (owner, group, world or all) to read the contents of of a file (e.g. cat, more, less, grep, etc.) or read the contents of a directory (e.g. ls reads and displays the directory’s contents).
At this point, please recall our OS and security discussion of authentication and authorization as they work hand in hand.
write permission refers to a user’s (owner, group or world’s) authorization to write or modify (e.g. edit and save the file) or delete a file, or for directories, the authorization to write or modify directory (e.g. create or delete files or subdirectories in the directory).
execute permission refers to a user’s (owner, group or world’s) authorization to execute a file or script or in the case of directories, enter the directory. For files, be very careful to never assign a non-executable file an executable attribute. For directories, execute permission allows you to traverse a directory (e.g. cd into a directory which may allow the user to cd further in the directory structure).
Permission examples from above: The file exercise5.7.txt has the following access permission: rw-rw-r–. This means the user (in this case j.looby) can read and write exercise5.7.txt (but not execute), the group j.looby (group is 2nd name ) can read and write exercise5.7.txt (but not execute) and the world can read exercise5.7.txt (but not write or execute). Now with respect to execute this makes sense as LoobyJamesLL.txt is not an executable file.
Now, let’s look at the ciss100 directory with access permissions rwx——. This means user j.looby can read the directory (e.g. ls), write to the directory (store files and create sub-directories) and execute or traverse the directory (e.g. cd). The group and world do not have write permission so users other than the owner cannot read the directory (perform a ls), write to the directory (create or move files) or traverse the directory (perform a cd).
Now look at the bin directory. Here the user/owner and group can read, write and execute but the world can only read and execute.
Field 3 – Links: This field conveys the number of links for the file (again note a file can be a file, directory, etc). As an example loobyjamesLL.txt has 1 link, albeit a broken link and the ciss100 directory has 3 links. So why does every directory have at least 2 hard links? Well, how did you move up one level in the directory structure to the parent (i.e. .. ) and how do you indicate the present directory (i.e. . ) => 2 links.
Field 4 – Owner: This field specifies owner of the file. In my example, all files are owned by j.looby.
Field 5 – Group: This field specifies the file’s group (i.e. work group). In my example, all files belong to group j.looby but we will work with this in the future as this is a powerful and secure mechanism to facilitate work groups.
Field 6 – File Size: This field specifies the size of file. In my example, LoobyJamesLL.txt is 163 bytes. Go back and perform a word count on your lastnamefirstnameLL.txt and see what it tells you but again note you will be performing a wc using the file’s soft link (see below).
Field 7 – Last modified date & time: This field specifies the date and time of the last modification of the file. These of course change when the file is accessed/changed but can also be modified using the touch command.
Field 8 – File name: The last field displays the name of the file.
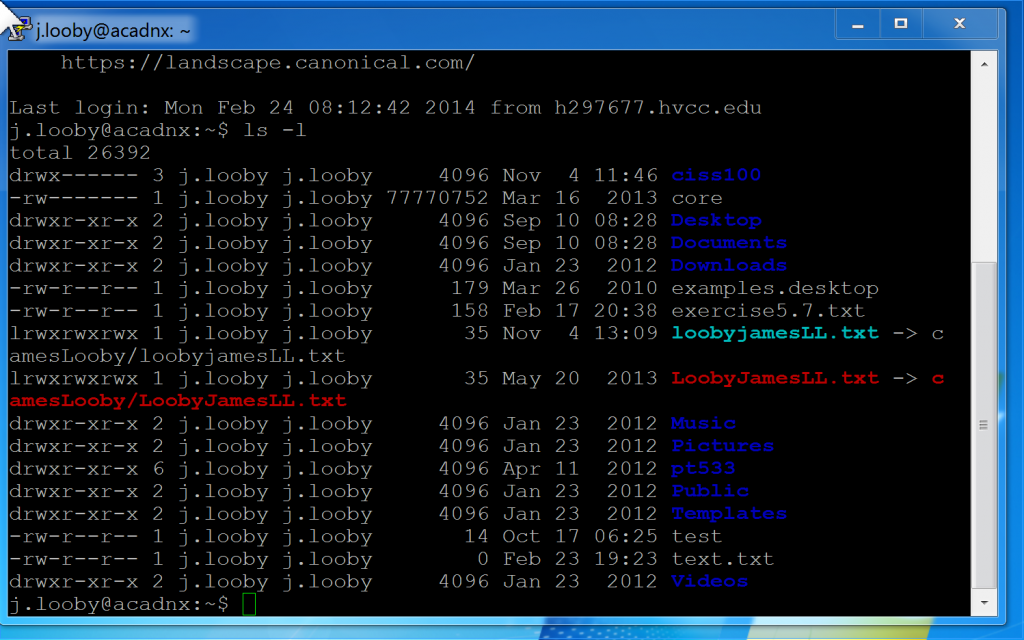
Now for completeness here is another screenshot of my terminal using PuTTy that shows a correct symbolic link in blue and an incorrect or broken link in red (some systems/distros will show a broken link blacked out). Note the field 1 file type of the link but we know that we treat it like a file (e.g. use rm to remove it).
5.1 Security First
Ok, let’s learn by observation. Please change directories to your home directory’s parent directory and perform a long listing. Here you will see everyone’s home directories and you will see that you have permission to both cd into their home directory and perform a listing of their home directory – DON’T DO THIS as it would be invading their privacy. To see the correct implementation look at my j.looby directory as I removed r-x permissions for the world. We will demonstrate how to resolve this later on.
Exercise 5.1: First, change directory to your home directory, then change directory to your home directory’s parent directory (where it shows everyone’s home directory). Show this directory and everyone’s permissions, take a screenshot and paste it into your submission file.
Please clear your screen after taking your screenshot and before continuing.
5.2 Modifying Access Rights
chmod (changing a file mode): Only the owner of a file (or root/SU) can use the chmod command to change the permissions of a file/directory. The options of chmod are as follows:
| Symbol | Meaning |
|---|---|
|
u
|
user |
|
g
|
group |
|
o
|
other |
|
a
|
all |
|
r
|
read |
|
w
|
write (and delete) |
|
x
|
execute (and access directory) |
|
+
|
add permission |
|
–
|
take away permission |
First please navigate to your ciss100/FirstnameLastname directory and perform a long listing. Now to remove read, write and execute permissions on the file lastnamefirstnameLL.txt (e.g. loobyjamesLL.txt) for the group and others, type
$ chmod go-rwx lastnamefirstnameLL.txt
Now perform a long listing and observe the results.
You should see that only user still has rwx access (i.e. the first 3 rwx characters are user with 3 dashes corresponding to group and other/all). What this did was prevent group and others/all from reading/writing/executing the file. Note if you had performed a chmod ugo–rwx you would have removed you (the users) ability to read/write/execute the file and note this would have broken any links you created to the file as well.
Now let’s give the world (user, group & other) read access to lastnamefirstnameLL.txt so enter the following and then perform a long listing to verify the result.
$ chmod a+r lastnamefirstnameLL.txt
Now let’s resolve our directory access security problem identified above. First, please navigate to your home directory if you are not already there and perform a long listing. What we want to do is restrict access to our ciss100 directory. We will leave the others as they are as we are mimicking a situation where ciss100 will have our private professional documents.
Exercise 5.2: Change the access of your home directory’s ciss100 subdirectory by removing rwx permissions for both group and other. Perform a long listing of your home directory and take a screenshot to verify and demonstrate the chmod command and the resulting change in ciss100 access permissions. Paste this into your submission document and submit this file. Note you just locked all other users out of this subdirectory and its files and subdirectories => demonstrates the enhanced discrete security of Linux based systems (see Security and Workgroup Analysis below).
***Note, if you remove your (the user’s) permissions you will break your links. You know how to identify broken links (LL3 and as communicated students must continually reread past material) so please be sure you performed the above correctly. If you did not perform the above correctly you will need to re-add the permissions back to rwx for ugo/all using chmod and +rwx and then complete the lab per the instructions ***
For a greater understanding of access permissions, please see here: linux.com.
Please clear your screen after taking your screenshot and before continuing.
Security and Workgroup Analysis
Now in exercise 5.2 above, we prevented anyone from reading, writing or traversing (moving through) the ciss100 directory so anything in this directory is immune to trespassers. Obviously, this includes the ciss100 FirstnameLastname subdirectory however consider this. What do you think would be the result if I left the ciss100 directory executable permission active (–x) but removed the read permissions. In this case, others could navigate through the directory but they could not read the directory (e.g. perform a listing) so they would need to know the contents of the directory to do anything. Now in this scenario, I could provide team members with the FirstnameLastname subdirectory name so my teammates would see and work on my projects but no others could (i.e. cd ciss100/JamesLooby)… of course, I would choose the sub-directory name carefully and not JamesLooby… 🙂
Please submit your assignment and note this is a good time to review past labs and readings since this lab is short.
| Command/Options/Arguments | Description |
|---|---|
| chmod [options] file | change access rights for named file |
| ls -lag | list access rights for all files/directories |
| wc | word count - returns lines, words and characters |