***Please recognize that interfaces/Web portals change and organizations like VMWare will not reach out and notify me when they change their interface. With this, it is understanding that allows us to proceed through a process portal rather than blindly following my directions below.***
Note that installing Linux on/in the Virtual Box (VB) VM is no different or more dangerous to your system than installing an application (e.g. installing MS Word) and the guest OS (Ubuntu) is simply a file to VB similar to the MS Word Document (e.g. .docx) that is just a file to MS Word. Also, most problems come from rushing through this installation, not following the instructions or a lack of attention to detail.
To begin, some resources:
The Virtual Box Website is here: https://www.virtualbox.org/
Direct link to the manual which students will need to access and refer to is here: https://www.virtualbox.org/manual/UserManual.html
As presented throughout this course, to succeed in this discipline we also need to learn to locate, assess and apply information. Should you run into trouble, along with getting assistance from your faculty I recommend you try Internet search as we also need to become self-reliant. To form a proper Google search, I recommend you use “Virtual Box” and append the topic or error message. If you’re further along during your Ubuntu installation I recommend you search the appended terms “Virtual Box Ubuntu” and the issue or error message.
Virtual Box (VB) Introduction
First please note that new software releases are out of my control – in other words, while I do my best to provide both detailed and generic instructions, I do not control your platform or Virtual Box or the Ubuntu community. Noting this, you may encounter updates and variances but this is IT today as you will encounter variances the rest of your professional life so please document your steps as sometimes you must try one thing only to return and try the alternative path. You will also need this information for the Discussion Board. Should you encounter difficulties, this is precisely what you should be posting in the Discussion Board so please keep a log and many students find they can assist others in the DB. This is a very positive outcome as you have heard me state that you are now IT professionals and it is our job to train others.
Again, as a resource/reference should you need it, the Oracle VM Virtual Box Manual is located here: http://www.virtualbox.org/manual/
Minimally, please read the VirtualBox Manual Chapter 1 here: http://www.virtualbox.org/manual/ch01.html
So to begin, I recommend you watch the following tutorials to understand the process and you may want to take notes.
Windows Virtual Box Installation:
Note this video addresses the VBox Big Sur issue/error when choosing the Ubuntu iso.
Mac Virtual Box Installation
There are many other good YouTube videos and other resources on the Web and you are free to search for and learn from any resources you find.
Now, if already use VMs (VMWare, Parallels, etc.), you can just install an Ubuntu guest OS in your virtual machine and skip the Virtual Box install.
VB Installation
Here we go. Again please read through these instructions first and then please follow these instructions explicitly to the letter (Although it is not a green approach, you may want to print them out and check off your progress as you proceed and I mean move forward word by word as the highest level of attention will ensure a successful installation).
I’ll reiterate this as students ignore that last statement… please follow these instructions explicitly to the letter… if I recommend “download to your desktop” please download to your desktop… not documents… not downloads… your desktop as this will assist with the faculty’s support. You may have to go into your Browser settings => downloads and choose “Ask me where to save downloads” or something of this nature depending on the browser. I apologize for continually repeating this but the vast majority of errors come from not following my directions and rushing through the installation.
1.1 Goto http://www.virtualbox.org/ and read the intro and see the Downloads and Documentation in the sidebars to familiarize yourself with the resources. This documentation should be your first point of reference should you encounter difficulties however I have also Googled any error messages I encounter with the name of the application (e.g. Virtual Box Installation or Virtual Box Ubuntu Install) and I have found the solution and arrived at the answer very quickly.
1.2 Navigate to/choose the main downloads link but also note the small downloads link in the sidebar as this has older versions that may be required if students have older machines that don’t support the latest version.
1.3 Choose and download the Virtual Box for your platform (one of Windows .exe or Mac .dmg or Linux hosts).
1.4 Install the downloaded Virtual Box
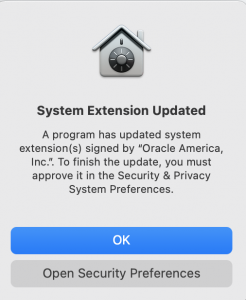
Mac users will have to approve the System Extension by opening Security Preferences, unlocking the settings with their admin password (lock in lower left corner) and approve the extension. Note this will also require a system restart.
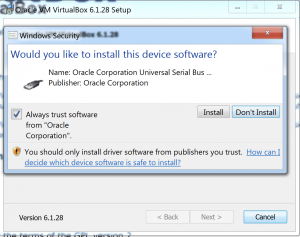
Windows users will choose “Trust Oracle”and allow the device driver to be installed.
1.5 After installation and a possible restart of your computer. Please open Virtual Box to test it.
* Now after it is installed you will receive notice of available updates throughout the semester. My recommendation is to get a running system and to not update to newer VB versions until after the semester is over.
Here are Matt Cantore’s VirtualBox Ubuntu 14.04 instructions that I have left for completeness. http://www.ciss100.com/wp-content/uploads/os-virtualization/VBGuide%20Ubuntu%2014.04.pdf
The most recent update (F17) here: Fall 2017 VB Ubuntu Installation Instructions
Ubuntu Download and Virtual Box Setup.
Again, please read this completely first before proceeding but you may wish to begin your download. Again, this is a snapshot in time and new LTS versions come out. You may choose the LTS version of your choosing and as a result the instructions will vary a little from what I present below below.
1. Download the Ubuntu 12.04 LTS ISO to your desktop from the Ubuntu link below noting this will work for the Microsoft Virtual PC VM or USB/CD installation as well. Again this is the 32 bit 12.04 LTS not one of the later versions. Also please do not update Ubuntu OS versions during this course but we will update Ubuntu’s software (BTW – please research what an ISO is if it is not familiar to you – http://en.wikipedia.org/wiki/ISO_image).
Again, please download to your desktop rather than letting your OS download it to documents or downloads or where ever. You may have to edit your browser’s download options to download to your desktop and this function is found in your browser’s options or preferences. Now once you download the .iso, DO NOT DOUBLE CLICK IT OR ACTIVATE IT. This .iso will be used as the VB Ubuntu installation media and we don’t want to install Ubuntu directly on our host overwriting our host OS. Again note, you are not installing this or mounting this in your host OS as it will be installed in the VB VM.
Again, I download the 32 bit 12.04 LTS Ubuntu Linux .iso to my desktop and my instructions will reference the desktop ISO image whereas the text or online resources may reference a CD/DVD/USB drive. Follow the Ubuntu Desktop link and download the 32 bit LTS version. Ubuntu downloads are here: http://www.ubuntu.com/download. (Note, for some people the download will hang at 6xx MB. If this happens, please pause and restart your download and it should finish).
As cited above, the download can take some time so plan accordingly (i.e. go get a cup of coffee and read the book or even better have a look around the Ubuntu site at Long Term Support, Windows side by side installation etc.). Also note the Ubuntu site states you will need to create a CD or USB stick to install however this is not correct for VM installations as the VM is an application already running on the Host OS. For clarity the Host OS is your system’s OS whereas you will install guest OSs in the VM (i.e. Virtual Box).
2. Now open VB if it is not open and click the “New” icon to set up a new VM. Following this click “Continue”.
3. Name it Ubuntu-LTS appended with a hyphen, the version number, another hyphen and your initials. For me at this point in time this would be Ubuntu-LTS-12.04-JGL. (note you can rename the guest VM at a later date so don’t be too concerned about a spelling mistake here). Also choose Linux and Ubuntu from the OS type drop down menus below (This is probably already filled in based on your Ubuntu input in the text box) and click continue.
4. Choose the amount of RAM to give the VM – 512 MB is a proper amount of RAM to give the VM but I have 8 GB on my machine so I give it 1 GB (1024 MB but you knew that) for better performance. If you can I would give the VB VM 1 GB as you will get much better performance. Then lastly, click “Continue”.
5. Choose the default Create New Hard Disk (Windows users may have to ensure the Boot Hard Disk or Start check box is checked) and then click “Continue”.
6. Select (VDI) Virtual Box Disk Image and click “Continue (This is new S12).
7. Here you have a choice between “Dynamically Expanding Hard Disk” and a “Fixed/Pre-allocated Disk”. The Fixed/Pre-allocated Disk gives better performance but the Dynamically Expanding disk will only take what it needs from your host OS so this choice is yours. Note: 12 GB is necessary for our the LAMP Final Project so I would minimally reserve 12 GB but I usually give mine 20 GB since I have a large HD. Following this please click “Create”. Note it is beneficial to see and record where the Hard Disk is being created as you can later move/back up this .vdi to other places and this includes the ability to put it on external storage and running from the external storage. The location of the VDI can be found in the Virtual Box Preferences.
8. Look at the summary and as introduced above you should research where the VDI image is being saved on your system. For me, choosing the default locations, my Mac location is: /Users/jameslooby/VirtualBox VMs/Ubuntu-LTS-12.04 and my Windows location is: C:/Users/jameslooby/VirtualBox VMs/Ubuntu-LTS-12.04
Again, this virtual disk image (VDI) appears to be just a file to your host OS but within VB (i.e. when VB loads the VDI after the guest OS installation), the VDI represents a fully functioning guest OS (e.g. OS, drivers, applications, etc.). This completes the Virtual Box setup of the VM Ubuntu environment now comes the Ubuntu install (i.e. Ubuntu will be installed in VB VM).
VB Ubuntu Installation
1. Now in Virtual Box you will see a VM – Ubuntu Powered Off so let’ s take a look at this. Click to select this Ubuntu VM and then click on Settings in the menu bar above. You will see the Basic settings and icons but choose the Advanced tab and have a look at all the VM’s settings. At this point there is no need to touch anything however you will see that here you can change the amount of RAM and storage allocated to the VM, the number of processors, etc.. Note if you do this in the future VB requires that the guest OS be turned off (i.e. not running). What a wonderful way to learn about system architecture.
In one of the tutorials we saw that the YouTube creator chose bridged network mode and take note of this as if you have network problems they can usually be resolved by choosing this option. In other words if you experience network problems later on, return to the setup and – Choose Network and change the “ Attached To” default “NAT” to “Bridged” and then choose OK or Apply (You should research but NAT gets a new IP address from the router/system whereas Bridged uses your host’s IP address). Note that interestingly, changing a malfunctioning “Bridged” connection to NAT also resolved networking issues in some instances.
2. Now for the install – Choose or select the Ubuntu icon you just created and click on “Start” – please read all screens during the installation and take notes as necessary (i.e. how to control which VM/Host the mouse and keyboard are attached to and how to switch this). When it comes to selecting a host or installation media, please navigate to the Ubuntu ISO you downloaded to your desktop. This can be found by choosing the little tiny folder icon to the right of the default path and navigating to your downloaded ISO on your desktop (or where ever you downloaded it to if you didn’t follow my directions) and then choose “Start”.
3. Choose “Install Ubuntu” rather than “Try Ubuntu” and I would select download updates while installing and install 3rd party applications if you are presented with these options. Again, this is being done in VirtualBox, if for any reason you have not followed my instructions and just downloaded the Ubuntuxxx.iso and you double clicked on it outside of VirtualBox…. STOP and go back and install VB and create the new VM in VirtualBox!!! I say this because students have ignored my instructions, downloaded Ubuntu without VB and overwritten their entire Windows system.
4. Choose “Erase Disk and Install Ubuntu” and choose “Continue” as this is installing Ubuntu in the VM and is not erasing your entire HD. You will verify this on the next screen as your hard drive is surely larger than 8, 12 or 20 GB. So with respect to the OS and VM Introduction you read, the VB VM is providing an interface or abstraction that looks just like your hardware/architecture and Ubuntu is getting installed right on top of this abstraction (i.e. the mimicked hardware) just as if you were installing it on a new machine. All of this is happening or being stored in a single file (i.e. the hard drive VB just created for your Ubuntu instance)… pretty cool hunh :). Lastly, choose “Install Now”.
5. Set up your time zone, user name with your full name in lowercase letters (e.g. for me this is jameslooby and note the first user is provided with sudo/sysadmin rights ) and computer name with UbuntuLTS-Initials (e.g. for me this is UbuntuLTS-JGL), and choose the defaults in other places. Note this naming is important for your assignments as it will identify you and your machine. I also recommend you take the splash screen tour.
6. Everything should work fine, Ubuntu should start and then will have to restart it. If you see an Ubuntu upgrade screen note that our labs are based on the stable LTS version so you should choose to not upgrade at this juncture (I would even choose do not remind me again if you are presented with this option). If you are interested in the newer version which is very nice, create another VM/VB guest and install another VB Ubuntu instance with the new version. If you accept the upgrade and it fails for some reason, delete the recently installed Ubuntu VM and reinstall declining the upgrade the next time.
7. You will lastly be prompted to “Remove media and hit any key to continue”. One artifact – during our first semester implementation a student identified one glitch where upon starting Ubuntu, the system wanted to continually reinstall Ubuntu. This was due to the system not unmounting the ISO used for installation (you will learn about mounting devices in the near future). Therefore, you should unmount (i.e. eject) the installation ISO (e.g. CD, USB or desktop image) otherwise, in some installations, you are continually cycled through the installation phase on each reboot. Since we have not explored this functionality in Linux yet you can also accomplish this by deleting or moving the desktop ISO file between reboots. I recommend moving it so if something untoward happens we at least don’t have to re-download the Ubuntu .iso.
8. You should now have an Ubuntu OS instance up and running. As a first task have a look around. Mouse over the desktop and top panel icons to see the readily available functionality. While your at it, open (double click) the “Update Manager” icon and go ahead and let the system update everything. If you have network problems, please try changing your network connection (i.e. NAT to Bridged as introduced above). Note you will probably have to restart your computer following the updates. Note you should install the VB extensions as directed below and these often resolve little variances in functionality (e.g. USB, Wireless, etc.).
If your system is not up and running, please note PC users have the option to install Microsoft Virtual PC or the free VMWare Player and install Ubuntu into these applications. This installation is even more straight foward since these options are enterprise applications. This information is found in the submenu.
BTW – as you look at system settings and Ubuntu One, does it look familiar? How about it Mac users?
9. Please read through the rest of this document for important information and instructions on how to shut down your system as this is very important.
10. If necessary see troubleshooting below and install the VB extensions.
11. Please take a screen shot and submit this in Blackboard (Screen shot instructions below).
12. Please take a snapshot of your Ubuntu instance after shutting down as directed below.
Screenshots (for assignment submission)
Many of the Linux Lab assignments will have you take a screenshot of your Ubuntu Desktop or Terminal (i.e. Shell or CLI) and paste this into a .pdf file
Ubuntu LTS 10.04 and other versions and Linux variants – Open applications -> accessories -> take screen shot of entire screen grabbing entire desktop and copy to clipboard.
Ubuntu LTS 12.04 open the Launcher Dash home (top icon in left panel dashboard) and type Screenshot in the textbox and then choose the Screenshot application. (Actually, if you just type “screen” you should see the Screenshot Camera Icon in the Applications panel). Note the various options as you can take a picture of the entire desktop, current window or even choose an area (you will be presented with crosshairs to select the region). Also note you can choose a delay so that you can open minimized windows or change focus to a particular window before the screenshot is taken. Lastly, note that you can drag the Screenshot Camera Icon to your left panel application menu bar or alternatively, once it is open, right click on its icon in the left panel launcher and choose “Lock to launcher” as you will use it throughout the Linux Labs.
After taking the screenshot of your Ubuntu system, you may open a browser in Ubuntu (Firefox) and submit them directly in BB (BB => LM => Assignment where you will be prompted to choose a file for upload). If this doesn’t work as many things in BB don’t, you can get the screenshot to your host system by mailing it to yourself using Firefox also located in the Launcher, or by putting it on a flash drive, or you can also read ahead to the VB Guest Additions and Shared Folders. Again note the screenshots are in your Ubuntu Linux instance and therefore do not exist in your host system until you copy them over should you wish to save them.
Please note the screenshots will not capture everything you have done even if you resize the terminal to be larger but they will demonstrate your current state which is what I need.
Now we have not really moved into exploring Ubuntu yet but there is another way to take screenshots – via Keyboard Shortcuts. In the upper right corner of your Ubuntu Desktop you will see a little gear (note this is where you shut your system down), choose system settings => keyboard => the shortcut menu tab => screenshots located in the left panel. You can remap these as necessary but I would leave them at the default but you may use these as necessary.
*** Screenshot Troubleshooting ***
If you experience any other screenshot difficulties, please use your host’s screenshot functionality to take a screenshot of your entire desktop that includes your guest Ubuntu OS and submit this from your host OS. (Note you should research how to take screenshots on your host OS on your own as this is a fundamental IT skill).
Note, one student was able to resolve the black screen screenshot problem by disabling 3D graphics in the virtual machine setup, this solution was suggested by a forum the student had googled.
*****************
Lastly, note that an Ubuntu screenshot is different from a VB snapshot. The screenshot captures your screen, a snapshot captures the state of your system and therefore provides you with a stable backup. Now having introduced this you should take a snapshot of your system when you shut down your Ubuntu system and you should shut down a Linux system. Snapshot instructions are located further below.
Troubleshooting (Please read this too as this is now our job)
Endless Installation => Mounting Problems
Ok, most reported problems are resulting from mounting problems. Let’s look at this. You are installing Ubuntu in VB. In this case VB is your machine and Ubuntu is your OS. This process uses the Ubuntuxxx.iso as the installation media and you should have researched what a .iso is. What happens if you install Windows from a DVD but never take the DVD out (actually MS solved this so I am speaking about historical perspective)? If you did not take the DVD out it endlessly cycled through the installation if the DVD was first in the boot order. With this basis, If you do not unmount the Ubuntu.iso or remove it/delete it from your desktop it will continually cycle through the installation. Now I recommend you just move it as you may need to reinstall and we don’t want to wait for another download.
Improper Disk Setup
The second major problem that could be occuring is that students did not properly set up the virtual disk image (VDI). The VDI is Ubuntu’s hard drive and therefore its bootable media. If VB is finding no bootable media you did not properly create the VDI (Create new HD).
Network & Wireless & Browsers
If your networking is not working you may have to play around and choose NAT instead of Bridged or Vice Versa. In VirtualBox this will require that you shutdown Linux, choose it in the VirtualBox Manager and configure the settings (Network NAT vs. Bridged). If you run into trouble, capture/copy the error message and see what Google uncovers as this will usually lead you right to the answer (e.g. Google Ubuntu installation and the error message). Also, can you use your Ethernet connection? Note the problem may be specific to your system (Dell, HP, Lenovo, Sony, etc.) so try Google to find an answer for your specific system (e.g. Google “Dell 4400m VirtualBox Ubuntu Wireless Problems” … where Dell 4400m is the model).
Nice add-ons and help speeding up WiFi etc. http://www.unixmen.com/201204-top-things-to-do-after-installing-ubuntu-2/
Here is another resource for wireless problems: https://help.ubuntu.com/10.04/internet/C/troubleshooting-wireless.html“
Ok, some people invariably have difficulties with either the Internet, Firefox and Mail… (again Google is your best friend until I read your email). Typically this will result in a security error message and the error message may even reference your storage. Let’s think, what is the resource manager of a system (I hope everyone immediately thought – Operating System or OS). As the resource manager the OS is responsible for both provisioning and security of all resources. (What are a computer’s resources, the CPU, processes, memory, Internet connections, files storage, etc.) With this let’s recall the Virtual Box Ubuntu installation where you set the system’s storage. To resolve the Firefox issue it is likely that you can increase the storage in settings when the VB Ubuntu instance (I use Ubuntu guest OS and instance interchangeably) or alternatively delete the instance and reinstall and allocate more memory to your Ubuntu instance.
USB
If you find you are having USB issues (flash drives, etc.) try installing the VB extension pack found here: https://www.virtualbox.org/wiki/Downloads
“Oracle VM Virtualbox Manager has stopped working“
This is new this Spring 13 and I am researching this but this error message occurs when shutting down VB. My inclination is this is a Windows flaw (e.g. Registry, etc.) as VB seems to start and run fine after you shut down and restart VB or if you shut down and restart your system. Since the error message occurs when shutting down which may indicate resource mismanagement or in other words – Windows. My recommendation is to continue and take snapshots after each lab and not waste any time trying to resolve a Windows flaw.
One author has solved this problem by deleting the virtual disk from the SATA Controller and adding the virtual disk to the IDE Controller with the following steps and note you will need to know where your VDI is located as instructed above.
1. Select your VM and goto Settings => Storage.
2. Right click on your virtual disk (VDI) under the SATA controller and select “Remove Attachment”.
3. Right click on the IDE Controller and select “Add Hard Disk”.
4. Click “Choose Existing Disk”.
5. Locate and select your virtual disk (.vdi) (again you should have recorded this location as instructed above).
6. Click “OK” to save your settings.
7. Right click on your new VM and click “Start”.
”Failed to load VMMR0.r0 (VERR_LDR_MISMATCH_NATIVE)”
Using Google on this string quickly leads to the resolution. Goto C:\USERS\<username>\AppData\
Windows 8
Ok, some Windows 8 users are having problems. I installed VB/Ubuntu on 2 different Win 8 systems and of course my installation went effortlessly when I wanted to experience everyone’s pain to debug people’s problems. A few hints:
In your BIOS make sure you have VT-X/AMD V Hardware Acceleration enabled (enabled is the default)
In your BIOS make sure your Hyper-V is disabled (disabled is the default).
Other Options
Note should VB absolutely fail which has not happened but in the interest of timeliness there are other options that include Microsoft Virtual PC free for Win 7 users, VMWare Player free for all Windows users, USB/CD installations that work for all PC users and even running Ubuntu in HVCC’s server Virtual Desktop Interface. All of these options except the VMWare Player are listed in the submenu system and you should try each and everyone of these at some point in your careers.
Virtual Box Extensions
Again, I do recommend installing the VirtualBox Extensions. To install the extension pack download the latest specific extension pack for your VB here (i.e. closest match): https://www.virtualbox.org/wiki/Downloads
Getting My Help
Again Google is your best friend as it is available 24/7 but I am here to help and I will get you through this as we have many alternatives. Note that per LM1 and the Course Introduction, I will not respond to emails that do not adhere to the “Contacting your Professors” email convention. Specifically I need to know exactly what step you are on so if you need help, please send me your last completed step so I can properly assist you. Also, I stated we must be precise with our terminology and our academic and professional success will depend on this. I know this is new to everyone as I am still receiving questions that demonstrates a lack of specificity (VB is a VM, Ubuntu is Linux, snapshot vs. screenshot, etc. )
Again I know this email policy may be misconstrued as harsh however we must transform ourselves into Information Systems professionals and this is a necessary step. To this extent students are responsible for rereading LM1 to find this information (and any or all previous coursework) as some students have requested that I simply resend this information. This also is a very important aspect of our development as CIS is foundational and we must frequently review previously covered material. In the future, if you continually ask your boss to resend information they previously sent, you will probably not last long in that position.
Congratulations!
If you are here you have done it!!! You have taken a major step forward and a new world is sitting at your doorstep. I do recommend you install the VB extension pack located here if you have not already done so: https://www.virtualbox.org/wiki/Downloads
Now when exiting you should shut down your system gracefully, while VB will shut down your system properly should you close the VB window let’s operate as if we are on a standalone Linux system. There are several ways to shut down the system, I use the gear icon in the upper right Linux window which expands to show “Shutdown”.
OK, so everyone should have an Ubuntu instance up and running so play around with the Ubuntu desktop (e.g. explore applications, firefox, etc.). Now note the Ubuntu desktop has undergone a major revision in version 11.10 as the panels were replaced by a dock-like launcher and task management panel that is displayed vertically along the left-hand side. The top panel will house application indicators, window indicators, and the menubar of the active window (very similar to Mac OSX). Now I admit I am was a little lost at first when trying to find functionality but now I just go to the dash home (top icon in left dashboard) and type in what I am trying to find (e.g. software center). Now I’m not sure I want my Ubuntu behaving like an iPad but oh well – 
Dual Boot Option
Lastly, you will note the Ubuntu has a Windows installer and this will add Ubuntu to your system in a dual boot configuration. While this seems to work for everyone I cannot recommend it or use it as it does change your system and I cannot responsibly ask that. For your reference the link is here: http://www.ubuntu.com/download/desktop/windows-installer
I do recommend you try the USB/Live CD installer though and the link is here: http://www.ubuntu.com/download/help/try-ubuntu-before-you-install Note that you can complete all CISS 100 Labs on a USB install so if you were not successful with your VB Ubuntu installation, please use this method for the rest of the course.
Discussion Board Posts
One component of this assignment is a discussion board (DB) that requires that you document/relate your installation experiences and your 1st impression of Linux in the Blackboard discussion. Your description should also detail your host system as this may identify common problems for certain platforms. It also gets you in the IT Support mindset as you will understand IT Support’s frustrations as I cannot tell you how many times I have received emails with “I can’t get my Firefox to work” without any other information. Of course this leaves me with absolutely no course of action. If nothing else, how would you improve my instructions above as training will become a component of your jobs (note that certain information has to be a little vague relying on the user’s intuition as I do not control VirtualBox’s or Ubuntu’s installation scripts or Website links and naming conventions). Also, could someone research and inform the group about the difference between a Virtual Machine’s Bridged vs. NAT networking modes? In some enterprise architectures you may need to use bridged mode if you are connecting directly to the system and need to see all server shares.
In summary your post should include:
1. Your host OS/platform
2. Your installation experiences/challenges
3. Your first impression of VB and Ubuntu Linux
If you have difficulties, please post your difficulties but email me with this text as well as email will show up on my radar quicker. From an OS perspective, email may be thought of as interrupt driven whereas me constantly checking for new posts is polling and polling is inefficient – 🙂
Snapshots
I recommend you take a snapshot to preserve your working VB Ubuntu instance/state. To take a snapshot, shutdown your Ubuntu and look at your VB with Ubuntu closed. Here is my screenshot of this:

Click/choose the snapshots in the upper right quadrant and you will see something like this:

Choose/click on the wee tiny little camera icon and VB will take a snapshot of your system state. Should anything go awry in the future you can return to this stable version. Note I do recommend you take additional snapshots in the future as you add functionality (e.g. Post LAMP/Wordpress installation, etc.).
In Closing
Should you want full screen mode, shared folders and other functionality, please perform the Guest Additions Installation/Configuration located one level down below this page in the top-level menu system. These are entirely optional and are unsupported by me as they can be finicky and seem to require reinstallation over and over and for some reason I do not have any say with Oracle… :).
Note, you should always shutdown a Linux system. You can find the shutdown command in various places but in Ubuntu 12.04 you will see a little cog in the upper right hand corner of the desktop and this will hopefully always house a shutdown icon. Lastly, you should research Ubuntu USB persistence should you wish to develop this platform to its full potential and please make sure you shutdown Ubuntu when you are finished (located in the Ubuntu System menu).
Thank you and let the fun begin – 🙂
Prof James G. Looby