Required reading
The Linux Command Line by Shotts – 3.16
In addition to researching the commands below, please review the textbook’s networking chapter as necessary.
Introduction
First, note that today’s Internet can trace its history, technology and functionality to Unix and Linux is, of course, a direct descendant of Unix (as is Mac OS). I can’t echo the importance of this area strongly enough as everything done in Business today has a Web component or impact and the Internet and Web in turn affects every business. Think about this, every organization is a hacking target and how do hackers gain access and do damage => through the network. To prepare you, below you will learn commands to both test your connectivity as well as to perform basic research verifying identity and in today’s world of aliasing, spoofing and identity theft this is very important.
It should be noted that Mac and Windows support networking functionality (networking is core OS functionality) through Mac’s Terminal (Linux based so identical) and the Windows command prompt (cmd.exe) and this uses Windows syntax which is slightly different. To this extent, I recommend you try some of these commands in your Mac Terminal or Windows cmd.exe (e.g. try ping, etc.). Note Mac is ~Linux so every command below will work in the Mac Terminal but Windows has some differences and the Windows Command Line Reference is here: http://technet.microsoft.com/en-us/library/bb490890.aspx
You will also see a lot of acronyms used in networking so look them up as necessary and you should, of course, try and research the commands in this lab in further detail as before.
Intro ScreenShot
Open or launch your SSH application (e.g. Mac Terminal or Win PuTTy). Please resize your Terminal to make it larger to capture as much as possible but note you may not capture everything and this will be fine. If possible just take a screenshot/picture of your open terminal as if you include other items the text in the Terminal can be very small making it harder for me to see your commands. Paste this screenshot into your correctly named pdf document and label or title this screenshot “Intro Screenshot”.
7.1 hostname
hostname shows/returns the system’s hostname
$ hostname # try this
7.2 finger
finger displays information about a single user or all users logged on the system (or a remote system). Typically shows the full name, last login time, idle time, terminal line, and terminal location (where applicable). Let’s see this in action.
$ finger
and then
$ finger j.looby #or another user you see online from your finger command
The chfn command allows you to change your finger information but this requires root or superuser(su) authorization and we, of course, do not have root authorization. As an example, I would set mine to be: $ chfn -f “Prof James G. Looby” -r “Brahan 206” -w “629-7269”. Finger may also display a plan file left by the user that displays the contents of a .plan file in the user’s home directory. Note .plan is a system file so the name must be exactly “.plan”. Here is a good finger resource: http://www.ghacks.net/2009/04/05/old-school-linux-solutions-finger/
Please create a .plan file in your home directory using vim. The .plan can be empty so you just need to create it and verify its presence with a complete listing. I will verify plans later in the semester.
Exercise 7.2: Take a screenshot and paste it into your submission document with the appropriate heading.
Please clear your screen after taking your screenshot and before continuing.
7.3 mail
While the world has moved to Webmail, command-line mail is still important as system administrators still need to send mail by invoking (running) scripts. Please read Linux Mail in the LL7 Networking submenu and then please send yourself an email from the AcadNX command line to your HVCC email account attaching your exercise 4.7. I entered the following on a single line, of course, leaving proper spacing.
j.looby@acadnx:~$ mail -s “j.looby AcadNX mail test” j.looby@hvcc.edu < exercise4.7.txt
Exercise 7.3: please take a screenshot of your hvcc.edu inbox showing you received the email you sent from the AcadNX command line.
7.4 ping (adapted from Cisco CCNA Lab)
ping uses the ICMP echo reply feature to test physical connectivity. Ping gives an indication of the reliability of the connection. Let’s first check that our OS’s Internet Stack (TCP/IP stack) is working so we will ping our own machine. Please enter:
$ ping 127.0.0.1 #ctrl-c to break out of ping cycle
When your networking functionality fails, this should be the first thing you do aside from checking the cables as this tests the integrity of your TCP/IP stack. 127.0.0.1 is a special purpose address commonly referred to as a ‘loopback’ since it is redirected by the computer’s network adapter back to the computer and therefore does not reach the connected LAN. When we (or a program) pings 127.0.0.1, we are testing our OS’s TCP/IP protocol stack.
To illustrate this approach of testing 127.0.0.1 first consider: when a light is out in your room, do you immediately call National Grid or do you look for a light switch. Following this, do you next check your breaker box, do you look at your neighbor’s lights? You can see where I am going with this as we start with the foundation and work up.
Exercise 7.4a: Break out of the ping 127.0.0.1, take a screenshot and paste it into your document.
Please clear your screen after taking your screenshot and before continuing.
Continuing on with Ping: Ok, so we worked with a raw IP address above (i.e. 127.0.0.1), now lets invoke our DNS.
$ ping albany.edu #again ctrl-c breaks out
ping’s first output line shows the Fully Qualified Domain Name (FQDN) followed by the IP address. A Domain Name Service (DNS) server somewhere in the network was able to resolve the albany.edu domain name to an IP address. Note, DNS servers resolve domain names, not hostnames, to IP addresses.
Without this name resolution, the ping would have failed because TCP/IP only understands valid IP addresses. It would not be possible to use the web browser without this name resolution. With DNS, connectivity to computers on the Internet can be verified using a familiar web address, or domain name, without having to know the actual IP address. If the nearest DNS server does not know the IP address, the server asks a DNS server higher in the Internet structure.
Let’s ping HVCC
$ping hvcc.edu
Did we find it? In our SSH connection, we definitely found it, however, please try this from your Mac Terminal or Windows cmd.exe. (Google “how to ping” appending your platform for instructions). You will see that visibility depends on where you are (inside or outside HVCC). HVCC surely has a DNS entry as you can Google it however quite often ping is turned off. HVCC has ping turned off so it can’t be pinged from the outside. As presented in class, if you don’t have a visible IP address it is much harder to launch an attack. I hope you turned off your ping responder in your Wireless AP as recommended and demonstrated in class (Lecture Capture available on ciss100.com=>security=>security tips).
Now having said this we still can get HVCC’s IP Address from the outside by using the host command introduced below:
Exercise 7.4b: Break out of the ping if necessary take a screenshot and paste it into your document.
Please clear your screen after taking your screenshot and before continuing.
Now in the future should you not be able to connect to Acadnx, we can use ping to determine if the network is up and therefore determine to some extent if the problem is client side or server side. Try this:
$ ping acadnx.hvcc.edu
7.5 host
host will return an IP address and uses both DNS and anything recorded in /etc/hosts. Try the following.
$host hvcc.edu
7.6 nslookup
nslookup will return the IP address of a host name however in contrast to host above, nslookup will not use the /etc/hosts file.
Continuing on: Ok, so we may know a site is out there using ping, host & nslookup but how do we learn more about or about the route the packets take?
7.7 traceroute (use the tracert command in DOS/Windows’ cmd.exe or Powershell for equivalent functionality).
traceroute is TCP/IP utility for tracing the paths that IP packets follow through the internet. Recall that IP packets are created from TCP segments and these packets may follow different paths between source and destination where they are reconstituted at the destination. The first output line shows the FQDN followed by the IP address. Therefore, a DNS server was able to resolve the name to an IP address. Then there are listings of all routers the traceroute requests had to pass through to get to the destination. traceroute uses the same echo requests and replies as the ping command but in a slightly different way as it will compute the path 3 times. Let’s try it by entering:
$traceroute albany.edu #note tracepath is also available
Now first you should immediately notice the traceroute originated from hvcc.edu as let’s not forget we are working on the acadnx.hvcc.edu server. Do you see anything else that is interesting? While this is a moving target you may see very different things, I typically observe the path goes through either NYC or Boston as packets will take the quickest path (biggest fastest pipe). This usually surprises people the first time they see this but the packets are taking the quickest route not the most direct. Notice that there may be relatively long delays due to congestion (asterisks due to time to live or ttl timeouts may also be present). The main thing to observe is consistent connectivity. Each router represents a point where one network connects to another network and the packet was forwarded through. Now if you have time, try traceroute for albany.edu again at some point in the future and compare results to determine the consistency of the route as it may be different.
Ok, let’s look at packets that have to cross the country. Please enter:
$ traceroute berkeley.edu #or usc.edu or ucla.edu or stanford.edu, etc.
Sometimes I will even get paths to Berkeley that actually go to Europe and sometimes I will get completely anonymous routers (security) in the middle of the country. A more detailed traceroute description is here: http://networking.ringofsaturn.com/IP/traceroutedoc.php
Note – if you see asterisks it means the router did not respond within the required timeframe (think security) and/or our AcadNX server which is situated behind firewalls filtered the information. You can see this using the tracepath command that reports “no reply”. Some students report FIOS gives nothing but asterisks. If you receive asterisks you may explore traceroute from your local machine. In Windows goto Start menu and search for Powershell (also works with DOS cmd.exe) and use the “tracert” command by typing “tracert albany.edu” at the Windows Powershell/DOS Command Line prompt. In Mac use your terminal as you have been with the Linux Labs and use the traceroute command in the terminal as presented above.
7.8 mtr
mtr is a network diagnostic tool that essentially improves upon traceroute by providing network quality and network diagnostic info. mtr can be left running to get real-time stats. Let’s see it in action
$ mtr albany.edu # use [q] to quit
7.9 whois
whois can be incredibly useful utility to determine identity and defeat spoofing and aliasing however it is used/supported less and less. whois is not installed in acadnx so you will have to try this from the outside in a Mac Terminal or in the upcoming Ubuntu VirtualBox implementation. dig is installed and can be used in its place but provides less information.
$ whois hvcc.edu #note you can also use dig
$ dig hvcc.edu #this shows less information
If you were able to see the whois results from an outside connection (Mac Terminal) the information should open the eyes of any budding SysAdmins as you are seeing 2 contact names and the opportunity for Social Hacking. SysAdmins (and everyone for that matter) must be particularly aware when they post on Bulletin Boards and Usenet groups. Imagine if a SysAdmin used his real name to either seek information or provide information (e.g. Imagine a Usenet group post asking for help – “System xxxx keeps crashing, does anyone have an answer”, or providing information, “Yes, you need to install patch xxx.xxx). In either case, a SysAdmin may reveal the systems they are running and provide hackers with research material or points of entry as it is easier to hack a known system. Lesson – never… never use your real name or your institution name in an online user group!!! Another lesson, don’t handcuff yourself by relying strictly on a Win OS as we need comprehensive resources.
7.10 talk
talk is the first chat program… really the first one – :). It is unclear if this will work for the labs as someone else must be online and I don’t want to impose this constraint on anyone. You could coordinate among yourselves or alternatively take a chance and use finger and try to talk to someone who is online with a very short idle time.
Good talk documentation here: http://linux.about.com/od/commands/l/blcmdl1_talk.htm
7.11 netstat
netstat is a very useful command revealing connections, routing tables, statistics and other vital information, to get a quick understanding of all netstat can do please see the netstat man page (please do this following and note we don’t need to fully understand this now).
$ netstat -s
$ netstat -i #interface statistics
$ netstat -rn #routing table information
7.12 ifconfig (ipconfig in Win OS)
ifconfig (and ipconfig in Win) is an incredibly useful tool that displays additional connection information as you can see if your interfaces have valid IP addresses (i.e. did they get addresses from dhcp. ifconfig can be used to set up your default gateways and set your DNS. Interestingly, if you have a Mac you will probably see a lot more information including whether you have mail. Let’s recall the networking stack (Application layer, TCP, IP, Network) and what layer is mail – ans. Application layer.
Try the following but I also recommend Windows users try ipconfig in their cmd.exe detailed below
$ ifconfig –a
Exercise 7.12: Please take a screenshot and paste it into your .pdf document.
You should be able to identify your hardware and IP addresses. BTW – are you seeing IPV6 addresses (128 bits in contrast to IPV4’s 32 bit address)? Do any of you have any collisions reported? If so what is your topology where ever you are?
Again, Windows uses ipconfig whereas the Mac uses the standard ifconfig. Windows 7 type in cmd.exe in search programs and files box at bottom of start menu and then ipconfig on the command line. Do you see your ethernet and wireless interface’s mac and ip addresses?
Please clear your screen after taking your screenshot and before continuing.
7.13 socklist
socklist is a perl script that displays list of open sockets (includes type, port, inode, pid) and this, of course, allows you to shutdown/kill necessary processes/sockets which is very important for security.
$ socklist
7.14 procinfo
procinfo gathers system information from /proc and prints it to the screen and displays information about installed hardware, running processes and open sockets.
$ procinfo
7.15 route
route allows you to view, configure and manipulate your IP routing table. Try the following:
$route -n
7.16 arp (Address Resolution Protocol)
arp is a very important protocol/command that resolves the IP to Ethernet mapping and is presented here: http://linux-ip.net/html/ether-arp.html. Minimally please try
$arp -a
Now if you are doing this at home (Mac Terminal/Win cmd.exe), you can check your Wireless AP’s log and you will see that its MAC address has been accessed/logged.
Exercise 7.16: Please take a screenshot and paste into your submission document with the appropriate heading.
Please clear your screen after taking your screenshot and before continuing.
7.17 SFTP (SFTP is Secure FTP)
We introduced Secure Shell (SSH) in week 2. As a refresher, recall that a very nice SSH introduction is located here and please pay special attention to the security information (i.e. spoofing): http://support.suso.com/supki/SSH_Tutorial_for_Linux
FTP or File Transfer Protocol runs over the Internet just as HTTP (Web) and SMTP (Mail) use the Internet (Application Layer protocol in TCP/IP protocol stack). SFTP extends this by adding end to end security. For background, Wikipedia’s entry on SFTP is here: http://en.wikipedia.org/wiki/SSH_File_Transfer_Protocol
While we can perform SFTP directly from the terminal or PuTTy or your browser (see screenshot below), it is nicer to have an FTP/SFTP client. I use FileZilla for my FTP needs and I recommend you explore FTP further especially if you are pursuing Web Design as this is how you will post to the Web Server if it is not local. For Mac, I recommend FileZilla downloaded from filezilla.org, for Windows I recommend WinSCP downloaded from WinSCP or cnet and here is the WinSCP guide: http://winscp.net/eng/docs/guide_connect
Mac users: I recommend the open-source FileZilla so please download FileZilla (but do not accept any associated addons) and use it to connect to Acadnx as documented in this screencast. As a download site, I recommend direct download from FileZilla.
Windows users: I recommend WinSCP and this is also located on the HVCC ACE on campus machines (Start menu => All Programs => SSH => WinSCP). A video of my WinSCP use is here:
Filezilla Interactive Mode (necessary for HVCC’s DUO authentication)

Browser SFTP: There are browser plugin/extension options so you may also use your browser (Chrome SSH extensions with SFTP functionality). Within this plugin you will find a little button/icon for SFTP and all you need to do is fill in the information as if you were using FileZilla. If FileZilla or WinSCP fails, please try this option.
Terminal SFTP access screenshot below noting I previously accepted the security certificate similar to what you likely did in LL2a. To learn about terminal SFTP functionality all you need do is review the SFTP man page. Note terminal access also allows you to make sure it is working should you have FileZilla/SFTP application problems.
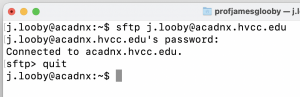
ChromeOS sFTP – https://chromewebstore.google.com/detail/sftp-client/jajcoljhdglkjpfefjkgiohbhnkkmipm?hl=en-GB&pli=1
Exercise 7.17
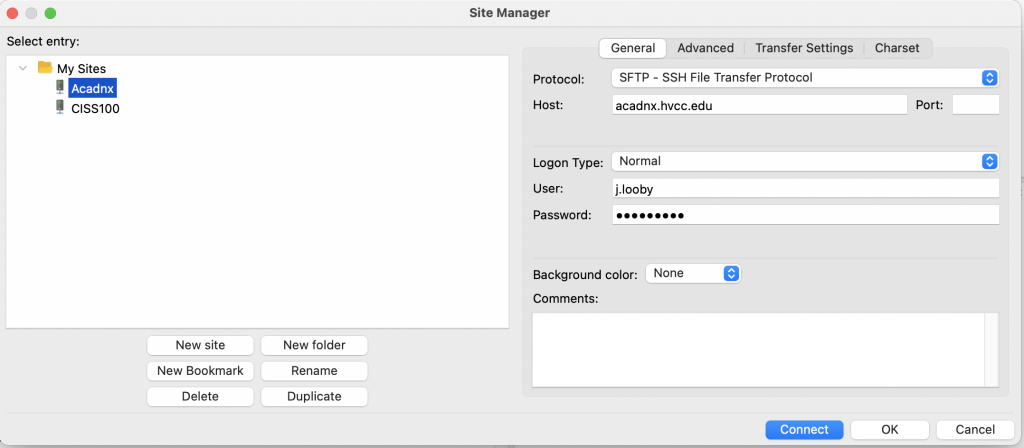
Please download Filezilla or WinSCP or the SFTP client of your choice and connect to the HVCC Acadnx server. Please recall I recommend you download from cnet for security reasons (i.e. search Filezilla download cnet and then choose cnet download). On campus please use WinSCP and this can be found in the start menu of ACE machines or you can always search for it in the start menu’s search box. Please save your present LL7 document (the one you’re working on) and drag and using your SFTP client, drag and drop this file into your AcadNX Linux home directory. Please take a screenshot of your FTP Filezilla window and its connection to the ciss100/username demonstrating you copied the LL7 file to your AcadNX . You could, of course, verify this file’s existing by performing a listing on this directory in the Terminal.
BTW – here are my FileZilla settings as a quick reference:
Please submit your pdf document in BlackBoard
Lastly, If you are so inclined you may even research setting up an FTP server on your home computer to retrieve files from anywhere but if you do this I would recommend you set up an SFTP server.
Getting Help Reminder
As in the past, if you need help I need to know the specific step you are on with screenshots, your platform (Win, Mac, Chrome, Mobile, etc.) and application (WinSCP, FileZilla, Browser Plugin/Extension, etc.).
In closing here is a nice Web resource with additional functionality: http://ping.eu/
| Command | Description |
|---|---|
| chfn | Change a users finger information |
| dhcp | |
| finger | |
| host | resolve DNS name to IP address |
| hostname | shows/returns the system's hostname |
| ifconfig | |
| netstat | |
| nslookup | |
| ping | |
| procinfo | |
| SFTP | Secure File Transfer Protocol |
| socklist | |
| SSH | Secure Shell |
| talk | |
| tracepath | |
| traceroute |